-
Mezzanines S
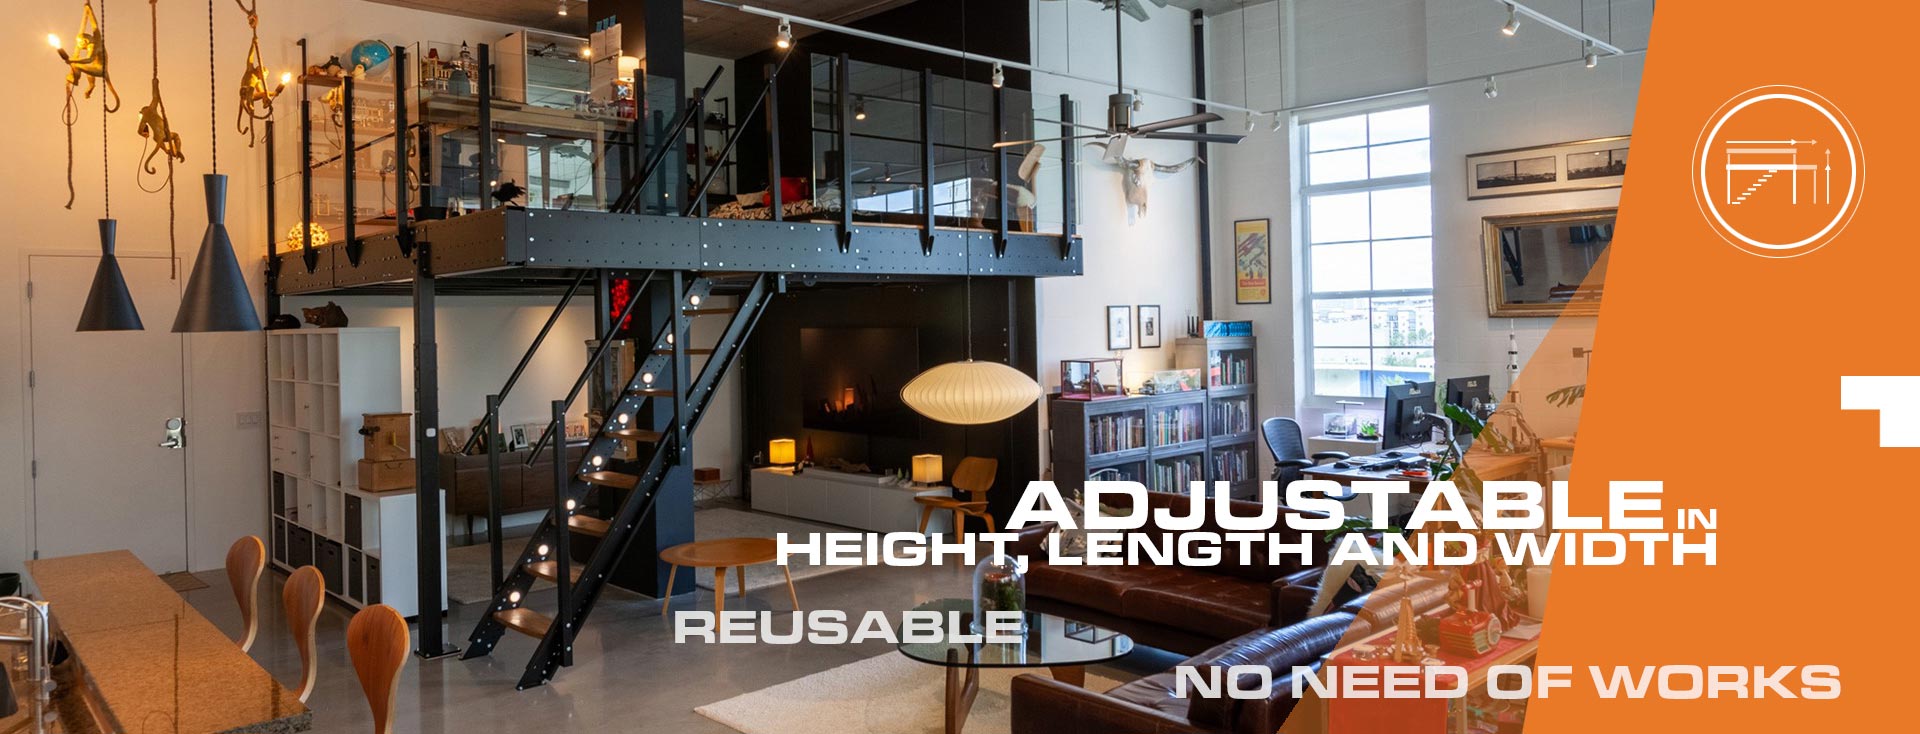
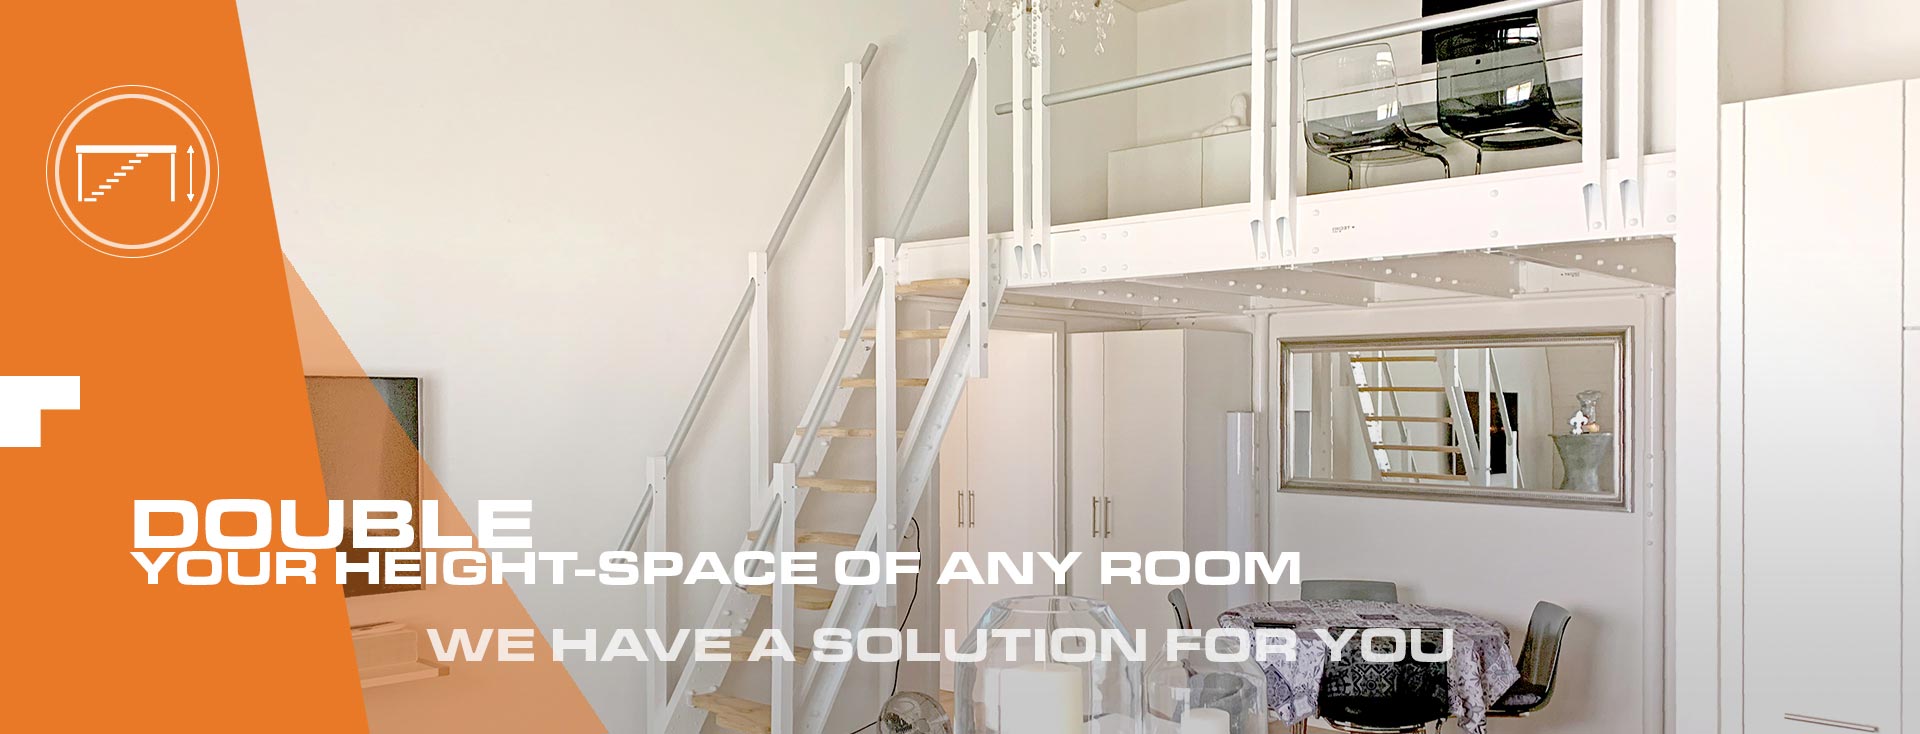
Height between 160cm and 233cm – Ideal for domestic use in small areas: bedrooms, living rooms, storerooms or garages. For loads up to 1400kg. You can compare S Mezzanines
Mezzanine TS 6

Kit Mezzanine TS 6
2 678,00 €
TS 5 Mezzanine

Truckle bed TS8 Colour-White
1 692,00 €
TS 4 Mezzanine

TS 4 Mezzanine Colour-White
1 377,00 €
TS 5 Mezzanine

Mezzanine TS 5 Colour-White
1 829,00 €
TS 8 Mezzanine

TS 8 Mezzanine Colour-White
1 952,00 €
TS 8 Mezzanine with S ladder
TS 8 Mezzanine with S ladder
M Mezzanines
Height between 173cm and 282cm – Ideal for high ceilings and wide areas as offices, big living rooms or lightweight storages. For loads up to 3000kg. You can compare M Mezzanines
TM 7 Mezzanine

Mezzanine TM 7 Colour-White
2 608,00 €
TM 10 Mezzanine

TM 10 Mezzanine Colour-White
2 961,00 €
TM 15 Mezzanine

TM 15 Mezzanine Colour-White
3 167,00 €
TM 15 Mezzanine with M straight stairs
Mezzanines L
Height between 209cm and 343cm – Ideal for very wide areas as commercial premises or warehouses. For loads up to 8500kg. You can compare L Mezzanines
TS 5 Mezzanine

TL 20 Mezzanine
5 367,00 €
TS 5 Mezzanine

TL 23 Mezzanine
6 197,00 €
TS 4 Mezzanine

TL 30 Mezzanine
7 432,00 €
TS 8 Mezzanine

TL 35 Mezzanine
8 289,00 €
TS 8 Mezzanine with S ladder

TL 30 Mezzanine with L long straight stairs
9 413,00 €
Mezzanines XL
Height between 235cm and 381cm – Mezzanines for industrial premises with immediate availability. They allow the use of hand pallet trucks and have a load capacity up to 1000kg/m²
TS 5 Mezzanine

TXL 32 Industrial Mezzanine
9 666,00 €
TS 5 Mezzanine
TS 4 Mezzanine
Mezzanine

Industrial Mezzanine TXL 20
7 126,00 €
Mezzanine

Industrial Mezzanine TXL 29
8 721,00 €
Mezzanine

Industrial Mezzanine TXL 30
12 038,00 €
Mezzanine

Industrial Mezzanine TXL 37
12 844,00 €
Mezzanines Extensions
Increase the surface of your mezzanine in the primary beams direction (“A” Extension) or in the secondary beams direction (“B” Extension). Add as many extensions as you need.
Extensions of the M range.

‘A’ Extension TS4 Colour-White
1 068,00 €
'B' Extension TS 4 Colour-White
1 151,00 €
‘A’ Extension TS 5 Colour-White
1 545,00 €
‘B’ Extension TS 5 Colour-White
1 613,00 €
'A' Extension TS 8 Colour-White
1 656,00 €
'B' Extension TS 8 Colour-White
1 736,00 €
Extensions of the M range.

‘A’ Extension TM 7 Colour-White
2 264,00 €
‘B’ Extension TM 7 Colour-White
2 380,00 €
‘A’ Extension TM 10 Colour-White
2 620,00 €
‘B’ Extension TM 10 Colour-White
2 732,00 €
'A' Extension TM 15 Colour-White
2 788,00 €
'B' Extension TM 15 Colour-Black
2 944,00 €
Extensions of the L range.

'A' Extension TL 20 Colour-White
4 884,00 €
'B' Extension TL 20 Colour-White
5 153,00 €
'A' Extension TL 23 Colour-White
5 547,00 €
'B' Extension TL 23 Colour-White
5 821,00 €
'A' Extension TL 30 Colour-White
6 633,00 €
'B' Extension TL 30 Colour-White
7 053,00 €
'A' Extension TL 35 Colour-White
7 497,00 €
'B' Extension TL 35 Colour-White
7 914,00 €
Extensions of the XL range.

“A” Extension TXL 32
8 492,00 €
“B” Extension TXL 32
9 112,00 €
“A” Extension TXL 20
5 933,00 €
“B” Extension TXL 20
6 567,00 €
“A” Extension TXL 29
7 534,00 €
“B” Extension TXL 29
8 163,00 €
“A” Extension TXL 30
10 860,00 €
“B” Extension TXL 30
11 484,00 €
“A” Extension TXL 37
11 674,00 €
“B” Extension TXL 37
12 289,00 €
Stability Kits
Needed when the mezzanine is flush against one wall or there are no walls
TS 5 Mezzanine

Stability Bar S Colour-White
94,00 €
‘Z’ Stability Kit S/M Colour-White
498,00 €
TS 5 Mezzanine

Stability Bar M Colour-White
112,00 €
‘Z’ Stability Kit S/M Colour-White
498,00 €
TS 5 Mezzanine

Stability Bar L Colour-White
124,00 €
‘Z’ Stability Kit L Colour-Black
610,00 €
TS 5 Mezzanine

Stability Brace XL
202,00 €
- Compare Mezzanines
Compare Mezzanines
Mezzanines S
Mezzanines S
DIV
-
- Stairs for reduced Spaces
Straight stairs
Stairs

Straight stairs
1 078,00 €
Stairs

Spiral Stairs
1 885,00 €
Industrial alternating tread stairs

Industrial alternating tread stairs
1 795,00 €
Spiral Stair
Boat Ladder

S Boat ladder Colour-White
512,00 €
Spiral Stair

S Ladder Colour-White
311,00 €
Stairs

S Lateral stairs
763,00 €
- Easily accesible stairs
Easily accesible stairs
You can compare easily accesible stairs
Escalera

Long L-shaped Adjustable Stairs
3 242,00 €
Escalera
Escalera

Long Straight Stairs XL
2 504,00 €
- Folding stairs
Folding stairs
You can compare folding stairs
Escalera
Escalera

Folding Stairs to wall 45º S Colour-White
1 367,00 €
Escalera

Telescopic aluminium ladder
1 190,00 €
Escalera
- Sairs Landings
Descansillo escalera
Stair Landing XL

Stair Landing XL
960,00 €
Descansillo escalera
Stair Landing Extension XL

Stair Landing Extension XL
780,00 €
- Beam for interior stairs
Viga escalera
DIV
-
- Railing
Railing
Low railing

Low railing
180,00 €
Extension Railing
Low railing extension

Low railing extension
146,00 €
- Loft bed Railing
Loft bed Railing
Loft bed Railing
- Panel Railing
Extension Railing
Extension Railing
- 4 tubes railing
Extension Railing
Extension Railing
- Public Use Railing
Extension Railing

Public Use Railing
0,00 €
Extension Railing
- Railing with safety skirting board
Extension Railing
Extension Railing
- Security Railing with Plate
Security Railing with Plate

Security Railing with Plate
281,00 €
Security Railing with Plate Extension
- Railing flank for lateral stairs S
Extension Railing
Extension Railing
div
- Safety pallet gate
Safety Pallet Gate

Safety pallet gate Colour-Yellow, Gate height-Type A, Width of the gate-Short telescopic width (150 - 190 cm)
1 749,00 €The Safety Pallet Gate, also known as Anti-fall tilting...
div
-
- Extra Accesories
Herramientas
Herramientas

Skylight 400x300mm Colour-White
53,00 €
Stair Drawer KIT Colour-White
41,00 €
Stair Drawer KIT 4 U. Colour-White
156,00 €
Herramientas

Rioja Hammock Colour-White
262,00 €
Magnetic base with hook
7,00 €
- Aesthetic improvements
Herramientas
Herramientas

TECROSTAR varnish
34,00 €
Floor finish kit
94,00 €
Herramientas

Self Adhesive Vinyl Planks Oak Pine
124,00 €
50 Hole Plugs Colour-White
3,00 €
50 Bolt Caps Colour-White
12,00 €
50 screws with nuts for holes
22,00 €
- Led Lighting
Herramientas

LED panel with remote control
184,00 €
LED panel
128,00 €
LED strip with magnets
31,00 €
Herramientas

One LED lamp lighting kit
221,00 €
Two lamp lighting kit
430,00 €
Herramientas


Need Help?
Installation
To install Tecrostar mezzanines you need 2 adults (they do not need to be DIY experts). It is recommendable to use personal safety equipment like gloves, boots, etc. in order to avoid accident.
When installing range L mezzanines you may need to use some type of scaffolding or ladder for working at heights and manual or electric lifting machinery to raise the primary beams, particularly if the structure is more than 3m high. The other ranges can be lifted easily by hand.
You will need the following tools to install the mezzanines: tape measure, some type of spanner for m10 and m8 bolts and a screwdriver (an electric screwdriver will make the task much easier), spirit level, drill and a tool for cutting the panels (saw, jigsaw, circular saw, etc.)
You can find all the tools required to assemble it and tested by Tecrostar in the tools section.
All the models are installed by following these steps:
Pre-assemble the structure on the floor in the desired area.
Raise the outer structure to the desired height.
Finish assembling the structure and floor.
Yes, you can. As they are manufactured with light steel profiles with a high yield point they are very light and the load per column is very low. The only restriction is the storage load on the mezzanine: instead of 200kg/m², it may be reduced to 800kg for the whole mezzanine. A home with a concrete structure usually supports a point load of at least 200kg on a surface of 5x5cm. The T8 mezzanine weighs 199kg and the T15 mezzanine weighs 356kg, both weights are distributed over 4 columns. You can install either of these two metal mezzanines in your home, provided that the load stored on them is limited. Ask Tecrostar about the specific features of your project.
You can do it yourself with the help of a friend. It is easily installed in a few hours, depending on the product.
TS8 Mezzanine: 3 hours with 2 people
TM15 Mezzanine: 4 hours with 2 people
TL30 Mezzanine: 5 hours with 3 people
The times are a guideline and for assembly only. You need to add the time it takes to measure up, move the components to the location, clean up, etc.
One of the most important sections is attaching the mezzanine. For greater safety and stability we recommend attaching the columns to the floor with the fixings supplied with the kit. In addition, we recommend attaching the mezzanine to the adjoining walls in order to stabilise the structure. The components for attaching the structure to the wall are also included.
Anchoring the columns to the floor
Anchoring the columns to the floor adds stability to the structure. We always recommend anchoring them, especially if mezzanines are installed in places where the columns can be knocked into (circulation of forklifts, etc.).
If the mezzanine is installed in a home and it is attached to the wall you can purchase column base kits so you don’t have to anchor the columns to the floor.
Attaching the structure to the wall
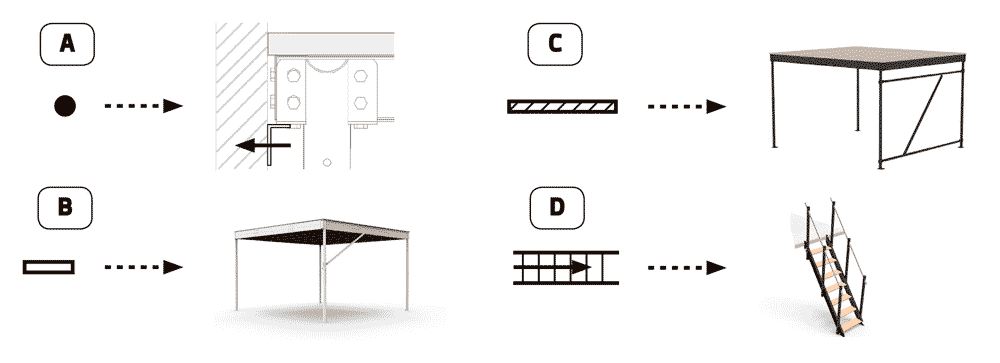
Depending on the number of adjoining walls, there are different systems for improving safety and stability.
Key:
A) Wall anchors
B) Brace
C) Z brace
D)Stairs (the stairs stabilise the structure)
E) pacer brace
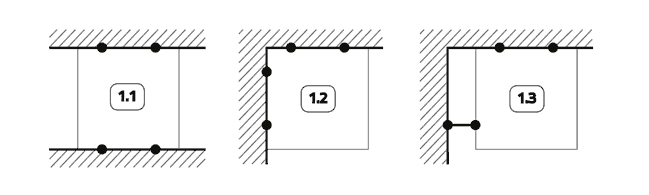
Two walls and anchored to the floor:
1.1 Two facing walls. Only wall anchors are required.
1.2 Two perpendicular walls. Only wall anchors are required.
1.3 Two perpendicular walls, one of them further away from the mezzanine. Wall fixings and spacer brace on the separated wall.
One wall and anchored to the floor:
2.1 Attached to one wall. Two braces are required
2.2 Attached to one wall and stairs parallel to the wall. No braces are required
2.3 Attached to one wall and inside stairs parallel to the wall. No braces are required
2.4 Attached to one wall and stairs with landing. One brace is required

3. No walls and anchored to the floor:
3.1 Without stairs. 4 braces are required
3.2 With stairs. 3 braces are required

4. No walls and not anchored to the floor:
4.1 Without anchoring to the floor, without walls and without stairs. Two Z braces and 4 normal braces are required.
4.2 Without anchoring to the floor, without walls and with stairs. Two Z braces and 3 normal braces are required.

5. Three walls
Bracing kits are not required but you do need to attach it to the walls. It is important the wood floor is rounded off against the walls.
Type of wall anchor
The walls can be made of different materials, according to which one type of bolt or another must be used to attach the structure to the wall.

M1 –
M2 –
M3 –
M4 –
M5 –
*(These bolts and wall plugs are not included in the kit)